June 01, 2018
DIY Flower Wall for Any Occasion

Do you dream about walking through flower fields? Are you a self-proclaimed flower child? Do you have a hard time resisting a fresh bouquet of blooms? If you answered “yes” to at least one of these questions, then a DIY flower wall is what you need to elevate your next event!
Watch on Youtube -DIY Flower Wall for Any Occasion
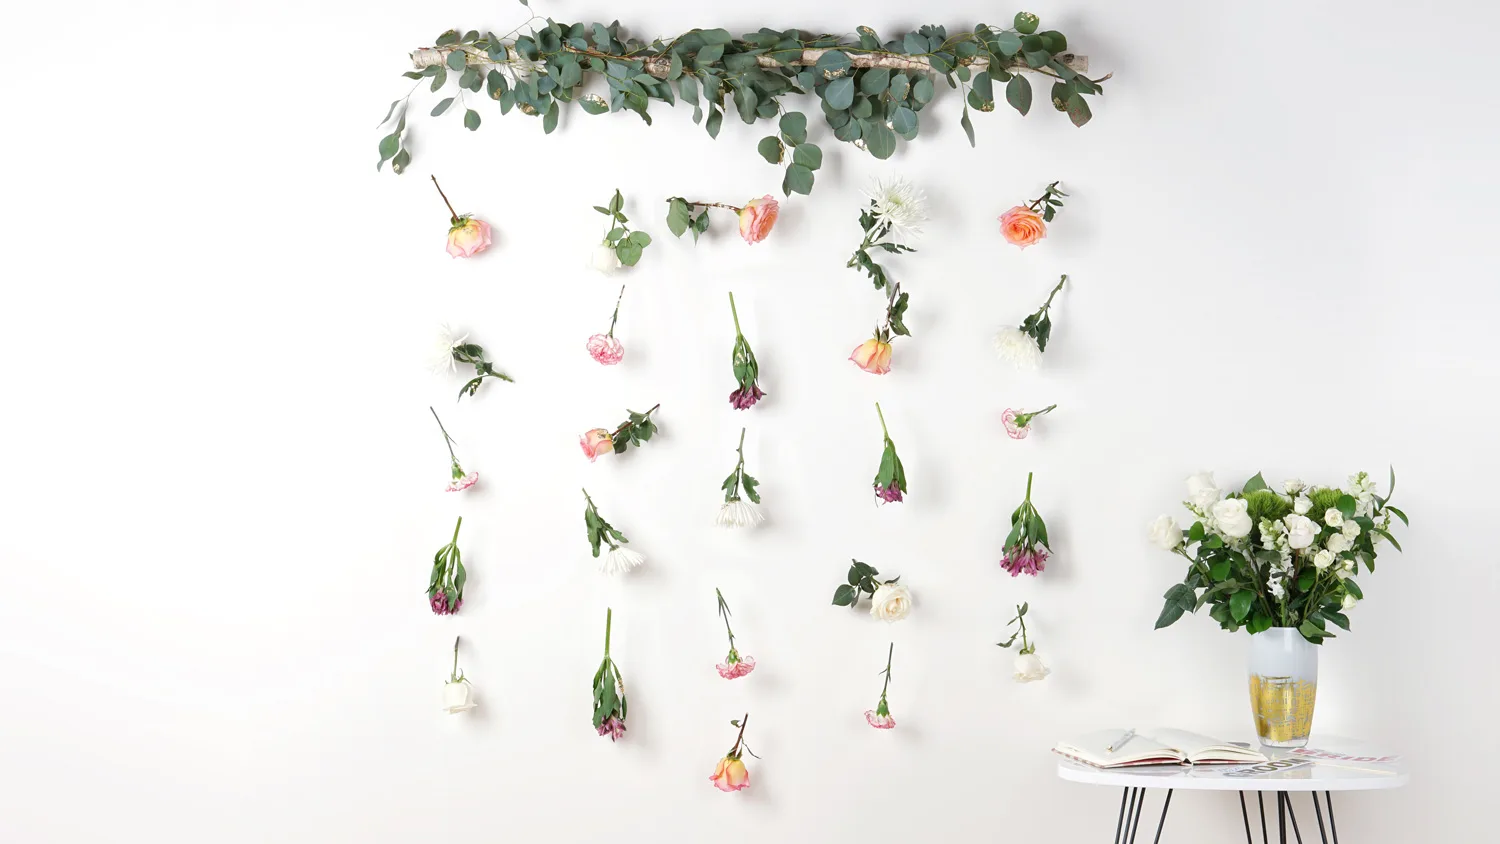
A hanging DIY flower wall is an elegant decor feature that’s simple to make and perfect for incorporating fresh flowers. We’re going to show you how to make a DIY flower wall in 7 easy steps. Before we get started, see what materials you’ll need to make a simple flower wall!
DIY Flower Wall Materials
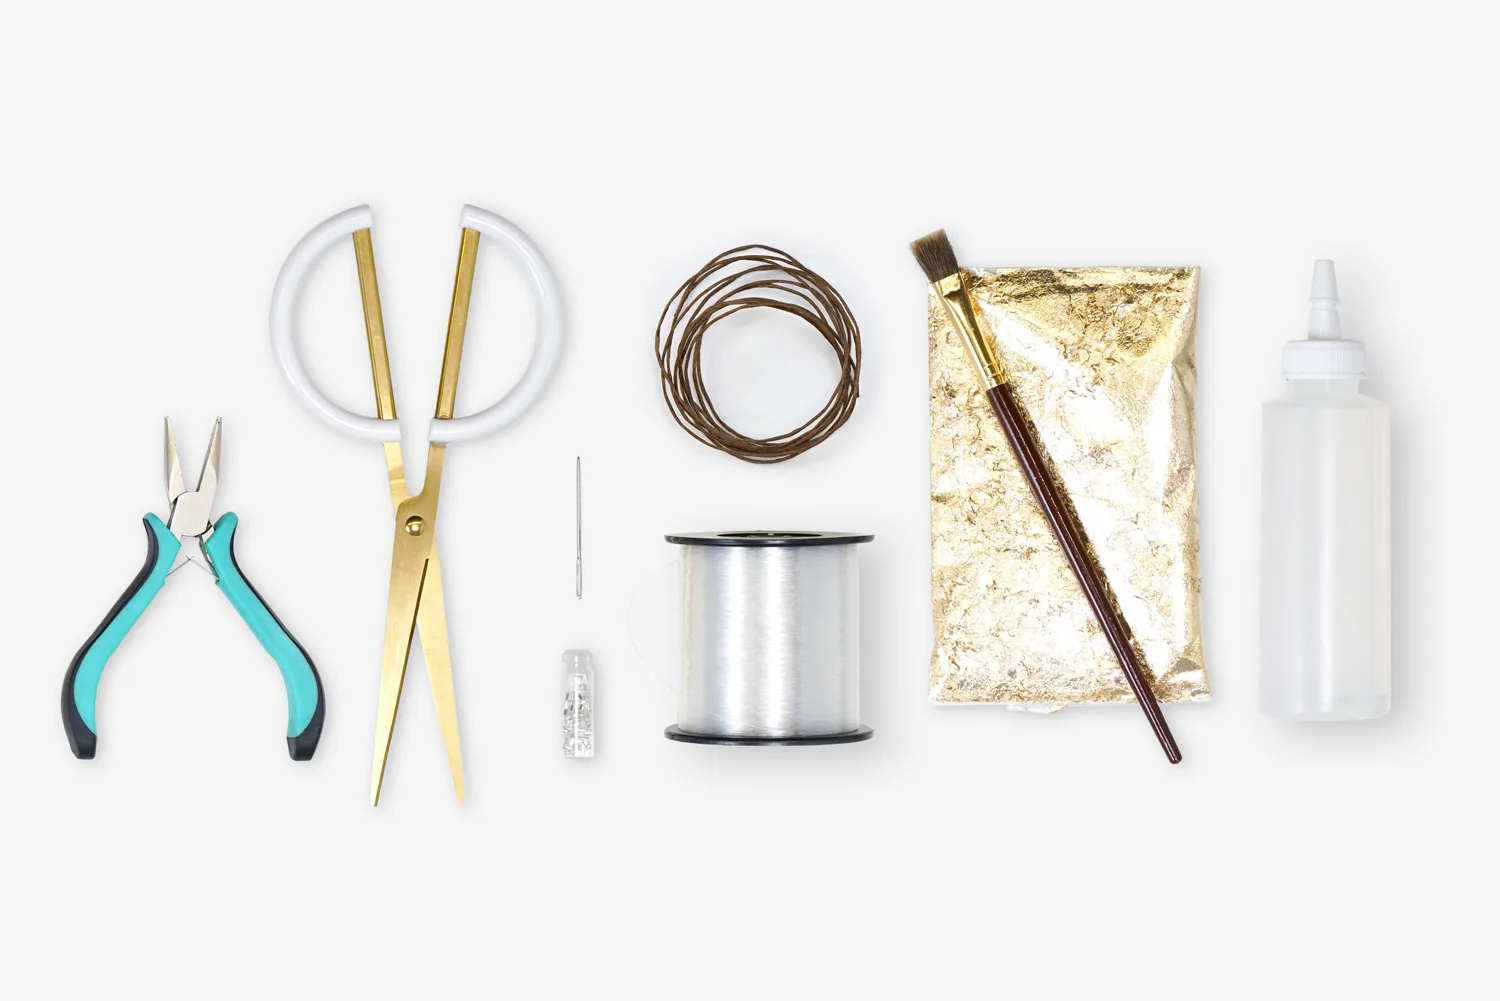
Pliers – Pliers are used to secure the crimp tubes in place.
Scissors – You’ll need a sharp pair of scissors to cut stems and the craft wire.
Needle – You’ll use this to thread the fishing line through the flowers.
Crimp tubes – Crimp tubes are used to secure your flowers in place and to make sure nothing you attach to the line slips out. It’s also used to secure your lines to the branch. You can pick up crimp tubes at any craft store and is normally found in the jewelry section. Smaller crimp tubes are best if you’re threading the flowers.
Craft wire – This will be used to secure the greenery and flowers to your branch.
Fishing line – Cut the fishing line about six feet long, depending on how big you want your wall to be. When in doubt, always cut more than you need! You’ll use the line to attach the flowers and tie to the branch, so extra line to work with is always better.
Paintbrush – You’ll use this to paint the glue to your flowers and affix the gold leaf to the petals and stems.
Gold leaf – Optional, but we used gold leaf to make our wall extra special. Experiment with other kinds of decor to see how you can make your flower wall your own.
Glue – Glue is used to attach the gold leaf to the flowers. White glue and clear glue both work well with gold leaf.
Branch – This is where you will hang your floral strands for your DIY flower wall. Of course, don’t choose a branch that is larger than your display area. We have a few hanging tips for you below.
Greenery – Choose greenery that matches the theme you want to create. For example, silver dollar eucalyptus is best for a modern wedding. Leather fern is a better choice if you have a rustic theme.
Fresh flowers – Select flowers with big blooms that will stand out in your wall. It’s best to pick flowers that do well out of water. We have a list of suggested flowers below.
Branch and Hanging Tips
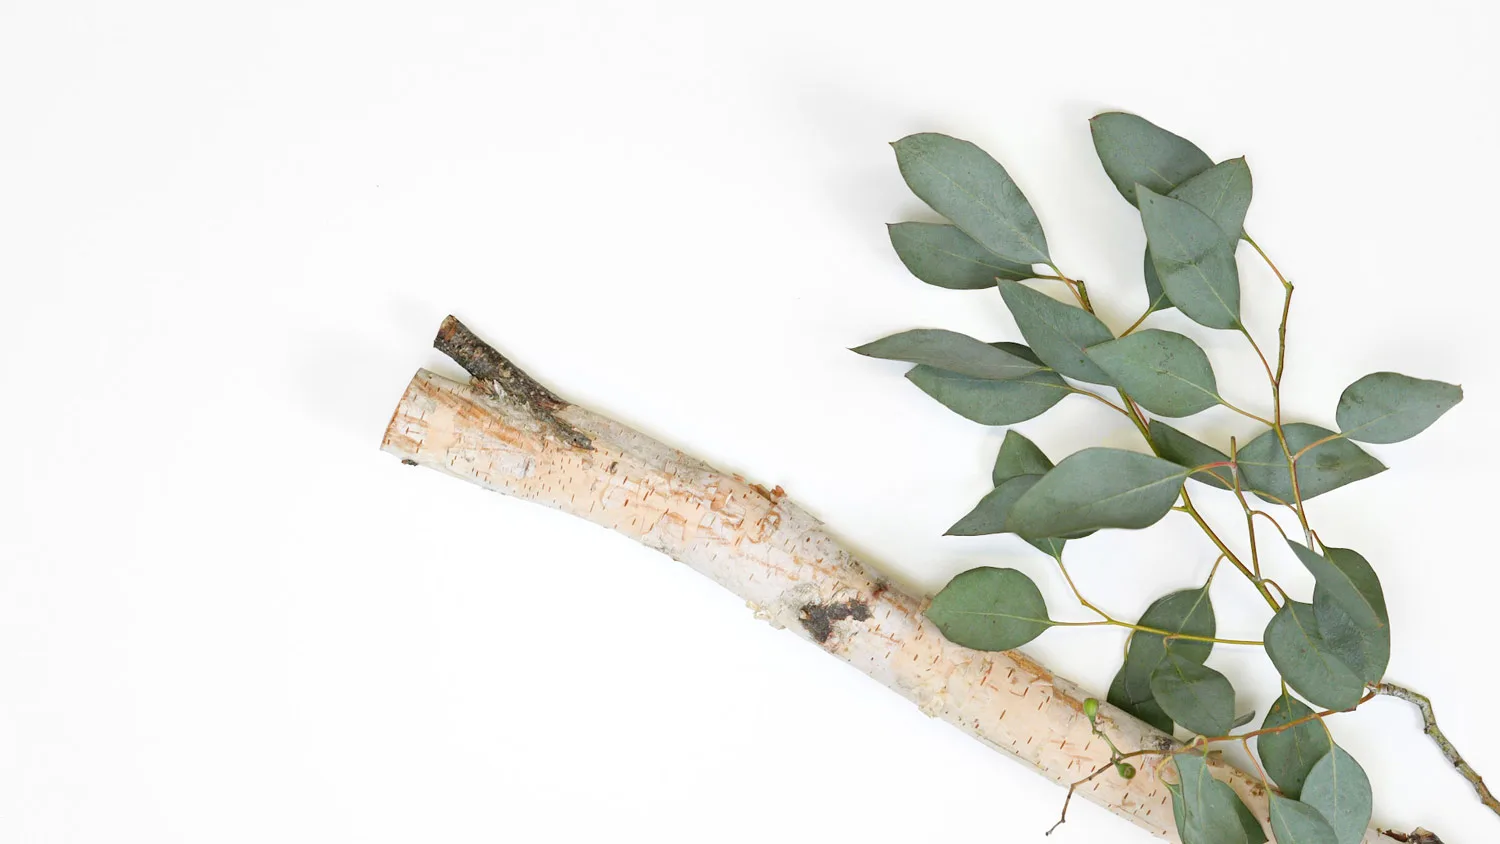
You can pick up a birch wood branch like the one we used at a local craft or hardware store. Alternatively, a plain wooden dowel can also work if you want a simpler look and this can be found at the same stores. An even better option is to find an existing spot in your home or venue to transform into a flower wall!
We used curtain brackets to easily hold our branch in place. Brackets are the hooks used to hold curtain rods. If you’re planning to use this method, measure the diameter (width) of your branch or dowel before you make a purchase. You want to make sure you get the right size since curtain bracket sizes are measured by diameter of a curtain rod.
Flower Favorites for your Flower Wall
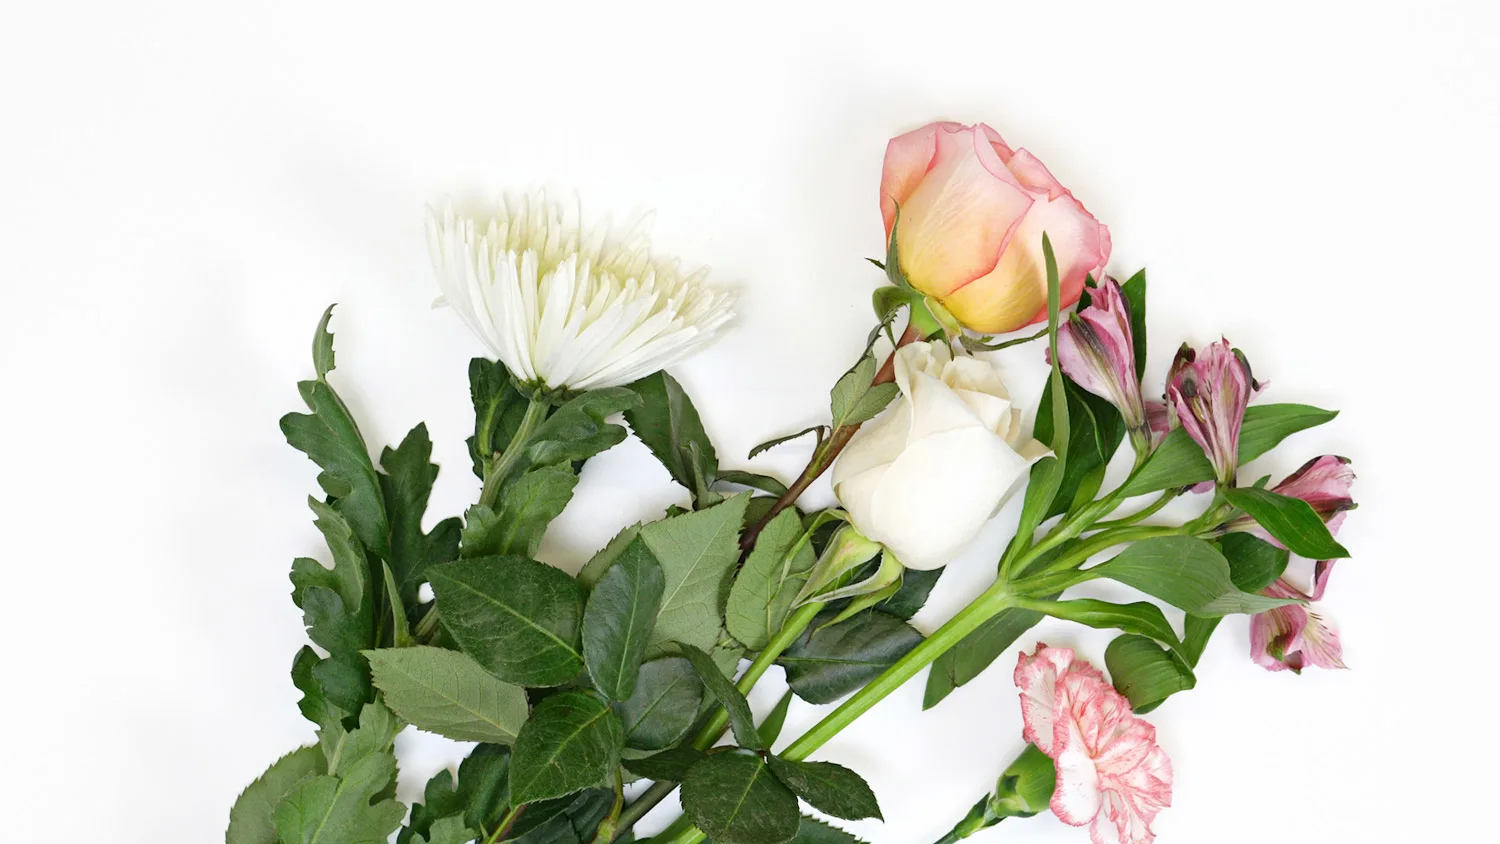
Regardless of the theme of your wall, you want to make sure you grab a variety of flowers!
You can try choosing flowers in a gradient of shades for an ombre flower wall. Or, if you want a monochromatic look, grab a large quantity of the flowers in the same color. For a chic look, try mixing up flowers and colors! We have flower wall inspiration below if you need a few ideas for what to use.
Here are some of our recommended florals:
Peony
Carnation
Dahlia
Amaranthus
Chrysanthemum
Baby’s breath
These are other popular choices for flower walls, but they’re a little more fragile. Although these are pretty choices, we only recommend using them if you won’t have your wall up for more than a day.
Ranunculus
Anemone
Gardenia
Pro Tip: Regardless of your flower choice, it’s best to keep your flowers in water for at least 24 hours prior to making your wall. This will ensure that your flowers are well hydrated before putting them on your wall. Keep a spray bottle also handy to refresh your flowers. Lightly mist the blooms from time to time throughout the process. Anything more than a light mist can drown your flowers and cause it to brown.
DIY Flower Wall Instructions
Total project time: 1-2 hours
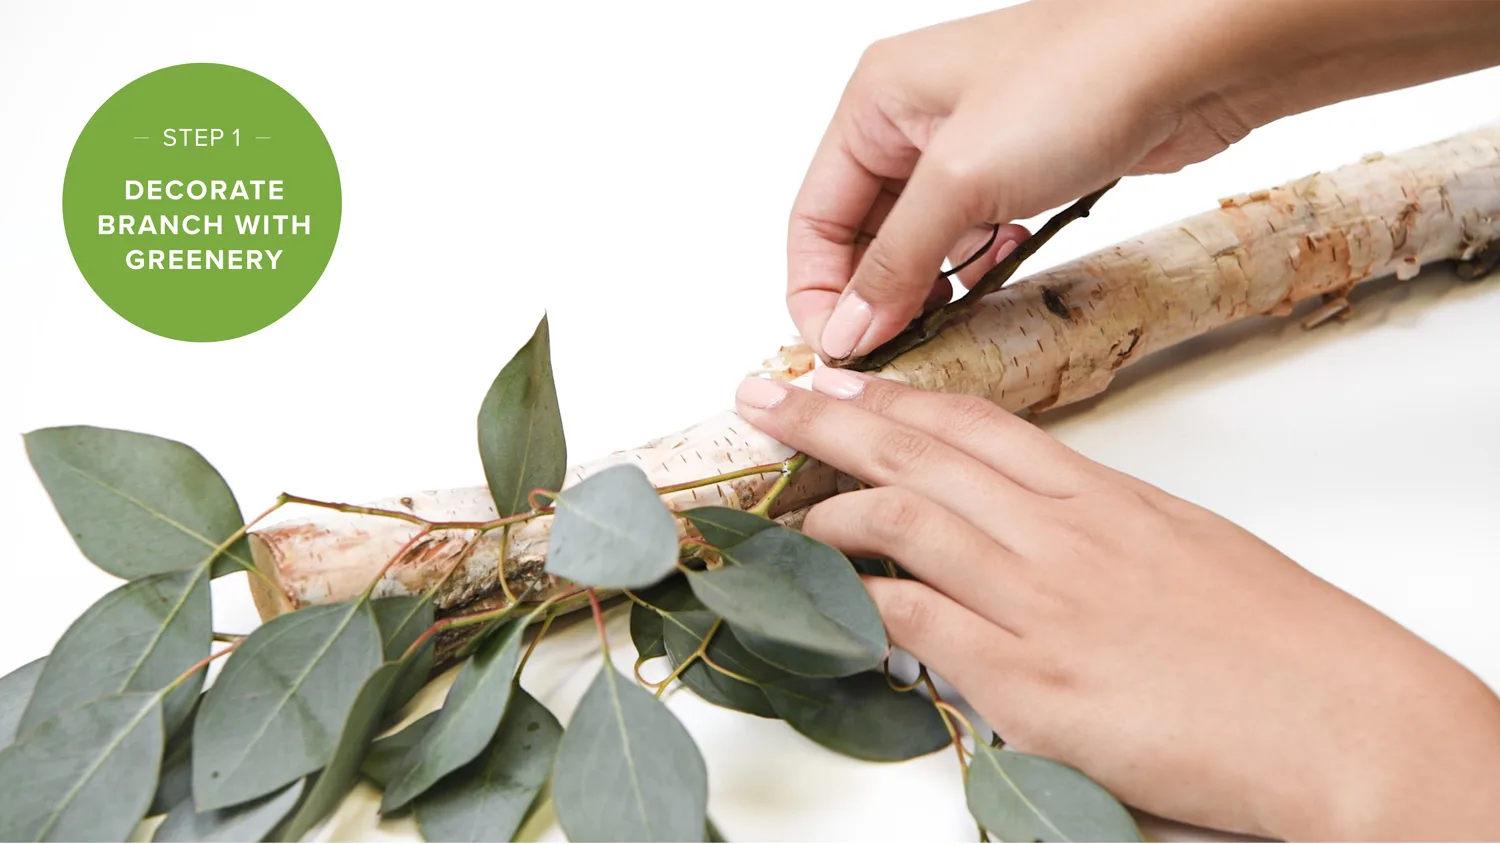
Step 1: Decorate your branch with greenery and flowers.
Begin by wrapping your chosen greenery around the branch where you see fit. To secure it to the branch, wrap craft wire around your greenery and tighten. Use a hot glue gun to secure any spots that seem loose.
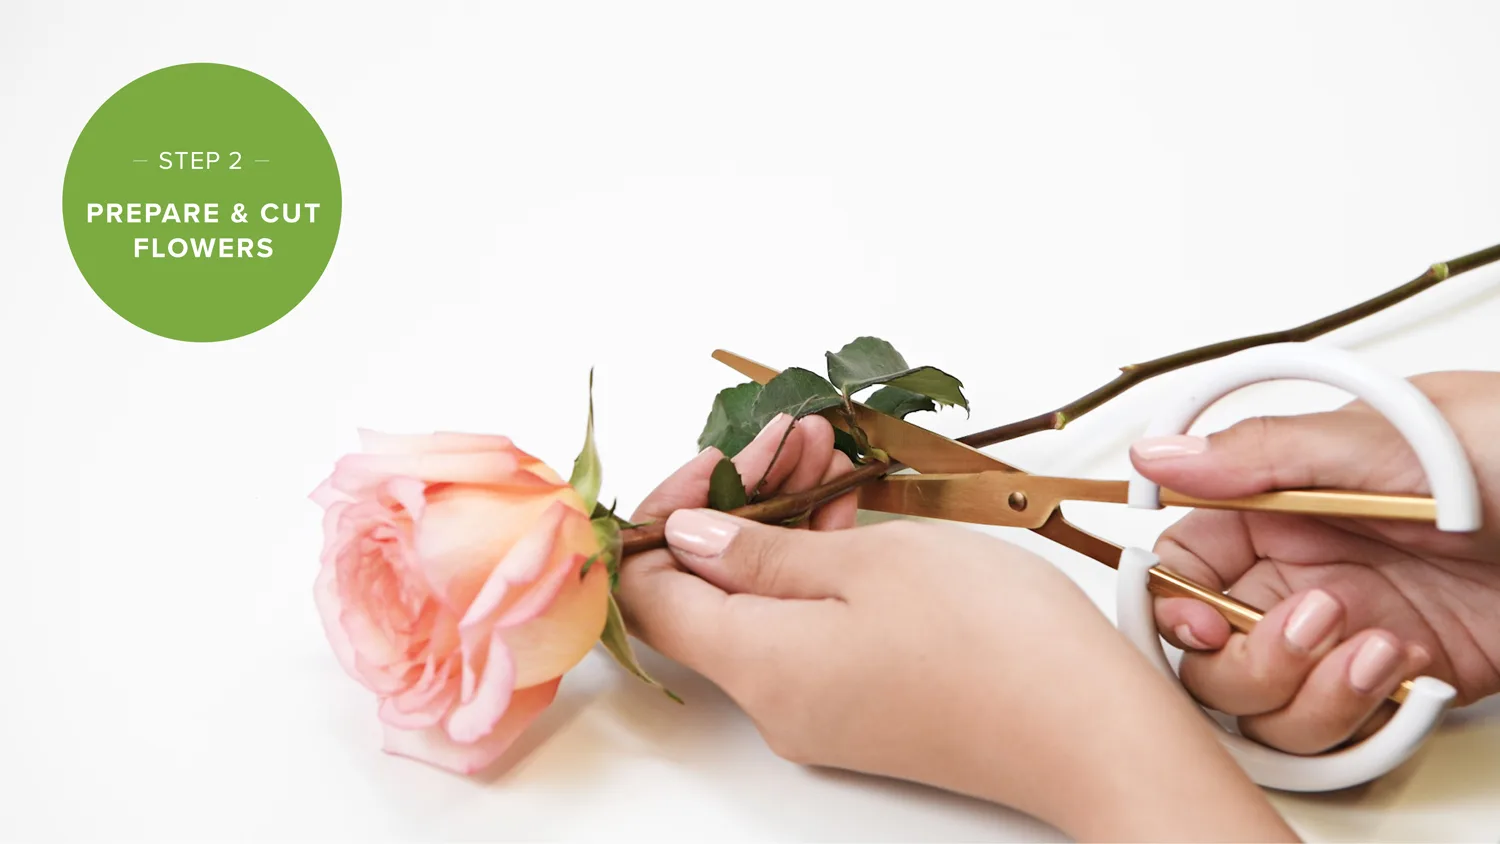
Step 2: Prepare and cut flowers.
Remove leaves from the stems if you’d like and cut the flower stems down to two inches. You can vary how much you cut depending on how heavy the the head of your flower is and what look you want. It’s slightly easier to have a flower hang more upright if it has a longer stem.
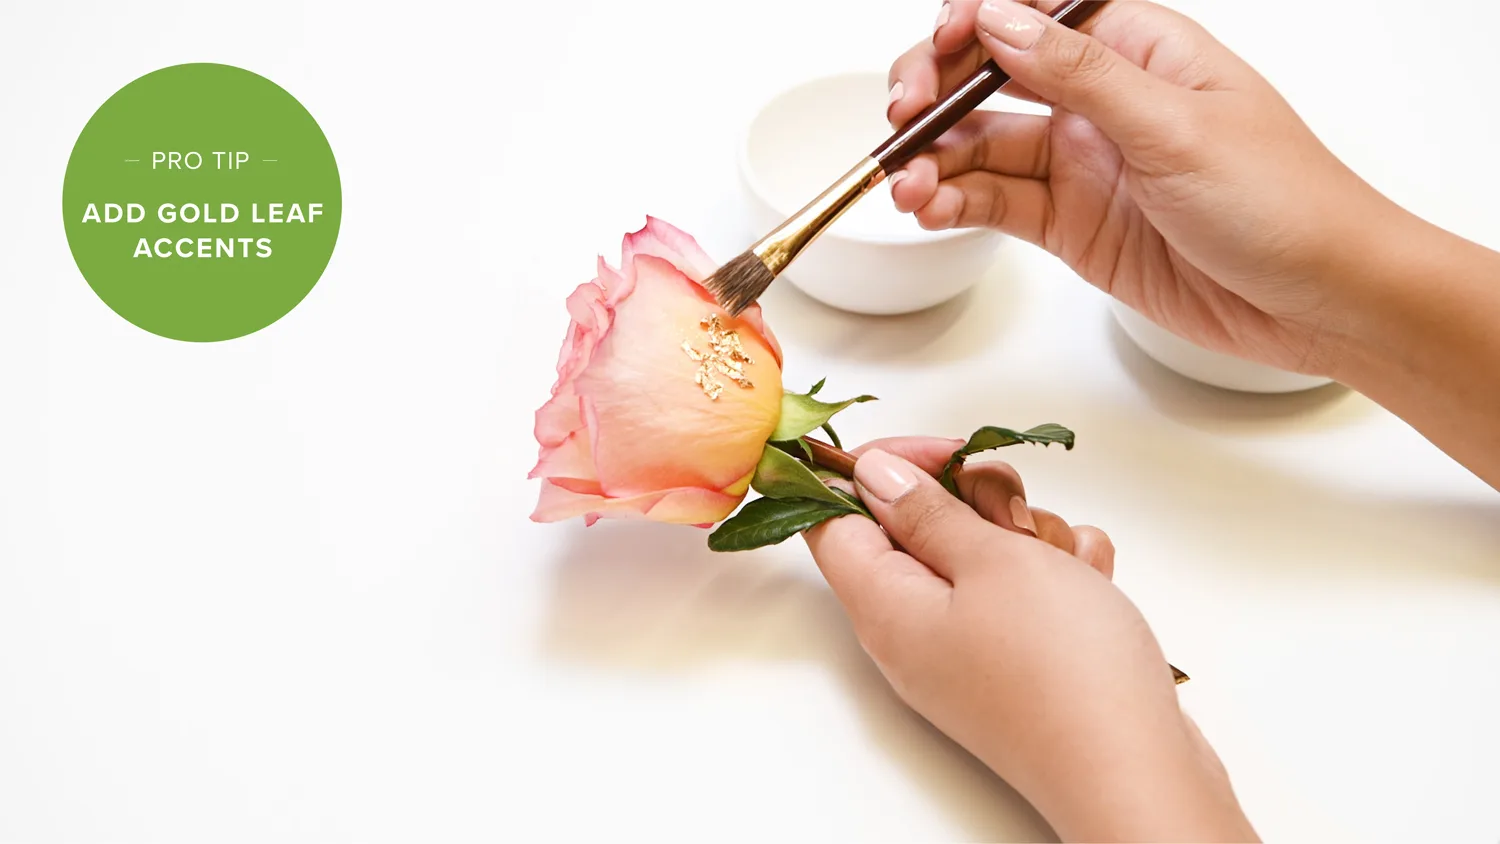
Pro Tip: Use gold leaf to add a dash of class to your flowers.
Put your glue and gold leaf in two separate dishes for easy use. Lightly dip your brush in the glue and apply it directly to the part of the flower you want to decorate. Next, use your brush to pick up a few flakes and pat it it to the desired area. We added gold leaf to some branch leaves, flower petals and flower stems.
These next steps will teach you how to create your flower lines! You’ll make about five to eight of these depending on how long you’d like your wall to extend. We created five lines with five flowers on each strand to fill out a four foot long branch.
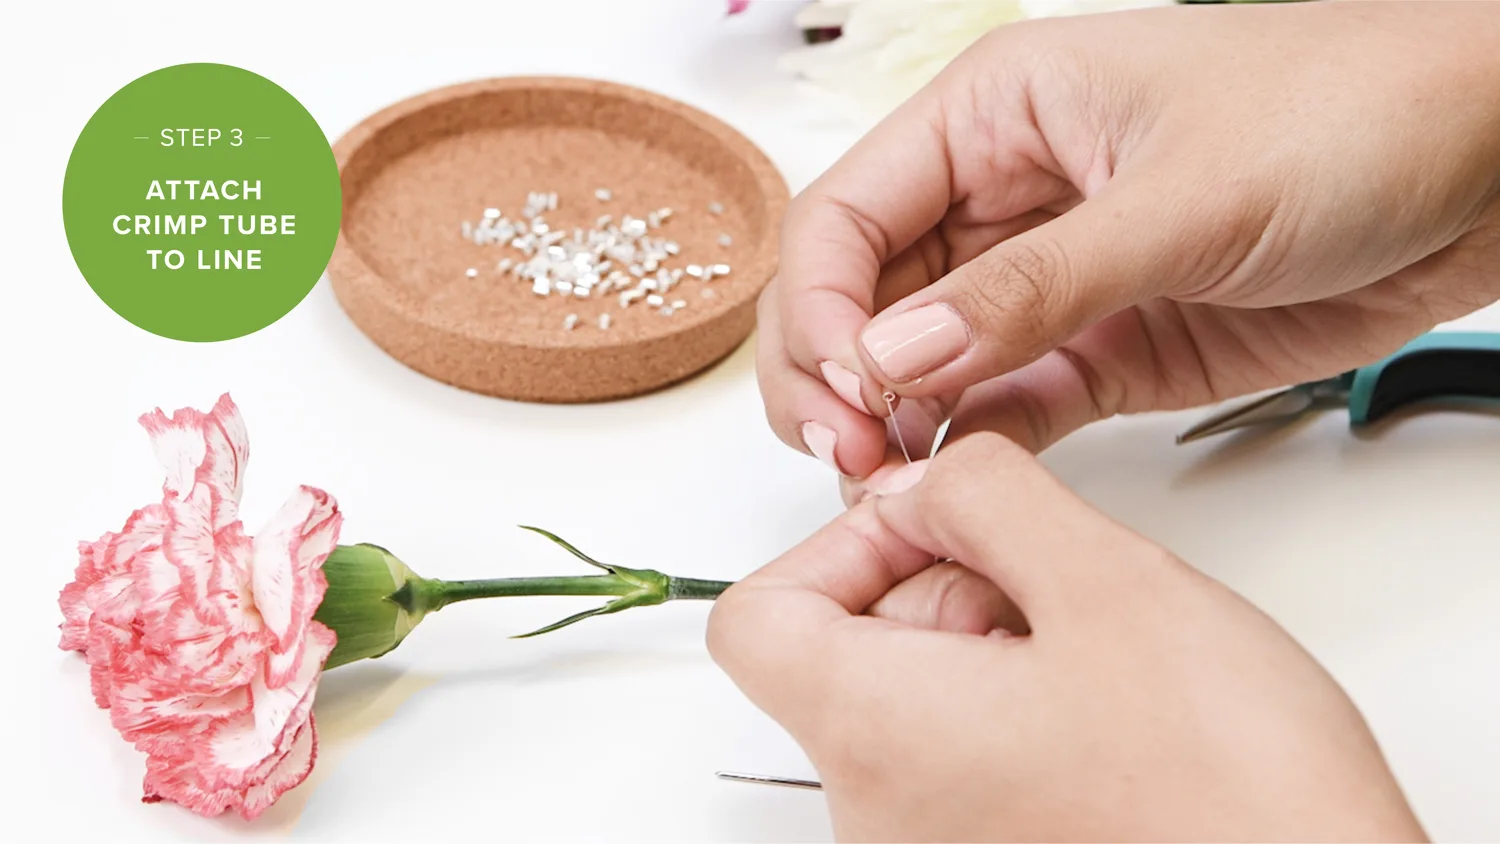
Step 3: Attach crimp tube to line.
Take a crimp tube and thread about five or six inches of your line through it. Secure it to the line by clamping it with your pliers.
Pro Tip: If you’re unsure about distance when you start threading other flowers, lightly clamp your crimp tube so you have the option to move it around. Firmly clamp your tube when you’re sure of your placement.

Step 4: Thread line through flower using the crimp tube as a stopper.
Start by threading the longer end of your fishing line through the needle. Use your needle to puncture your flower’s stem and pull the needle through until the crimp tube is directly against the flower. Pull the entire needle out of the line when the crimp tube is in place.
Repeat steps 3 and 4 for all of your flowers while keeping an even amount of spacing. Note, the first flower you attach should be the end of the line, so you are working from the bottom up.
Hold your line up every now and then to see your progress. Remember to leave at least a foot at the end to comfortably tie your line around your branch. The more you leave at the end, the more room you have to adjust height.
Pro Tips for attaching:
You can make your flower hang differently depending on where you thread.
The flower will hang more upright the closer you thread to the bloom. However, a flower hanging upright is more likely to die the next day than a flower hanging more downwards. This is because, if the flower is hanging downwards, the water from the stem will be pulled towards the bloom and keep it hydrated a bit longer.
We highly recommend using crimp tubes because the line is easily tangled and hard to secure on its own.
If you do not have crimp tubes available, we recommend using a hot glue gun as another way to secure your knots. Attaching the flowers is easiest to do when the line is laying on a flat surface.
If you accidentally pull the crimp tube through the stem, pull the fishing line out of the needle, tie a knot around the stem
and secure your knot with another crimp tube and continue down your line.
These next steps break down what you need to do to securely attach the lines your branch.
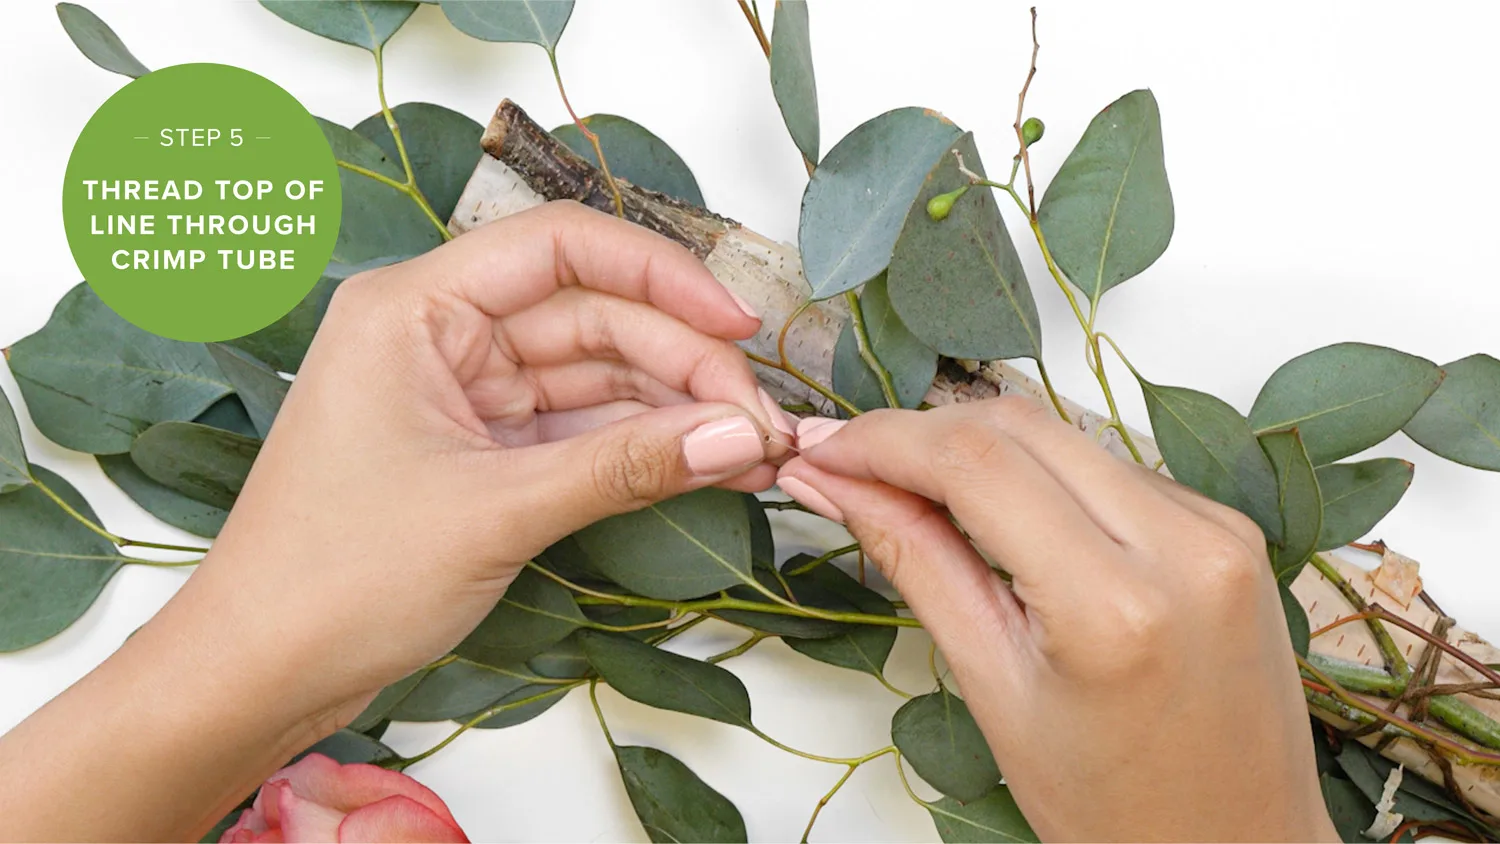
Step 5: Thread the top of your completed line through the crimp tube.
Just like you did for your lines, thread the end of your completed line through a crimp tube. Do not clamp your tube just yet!
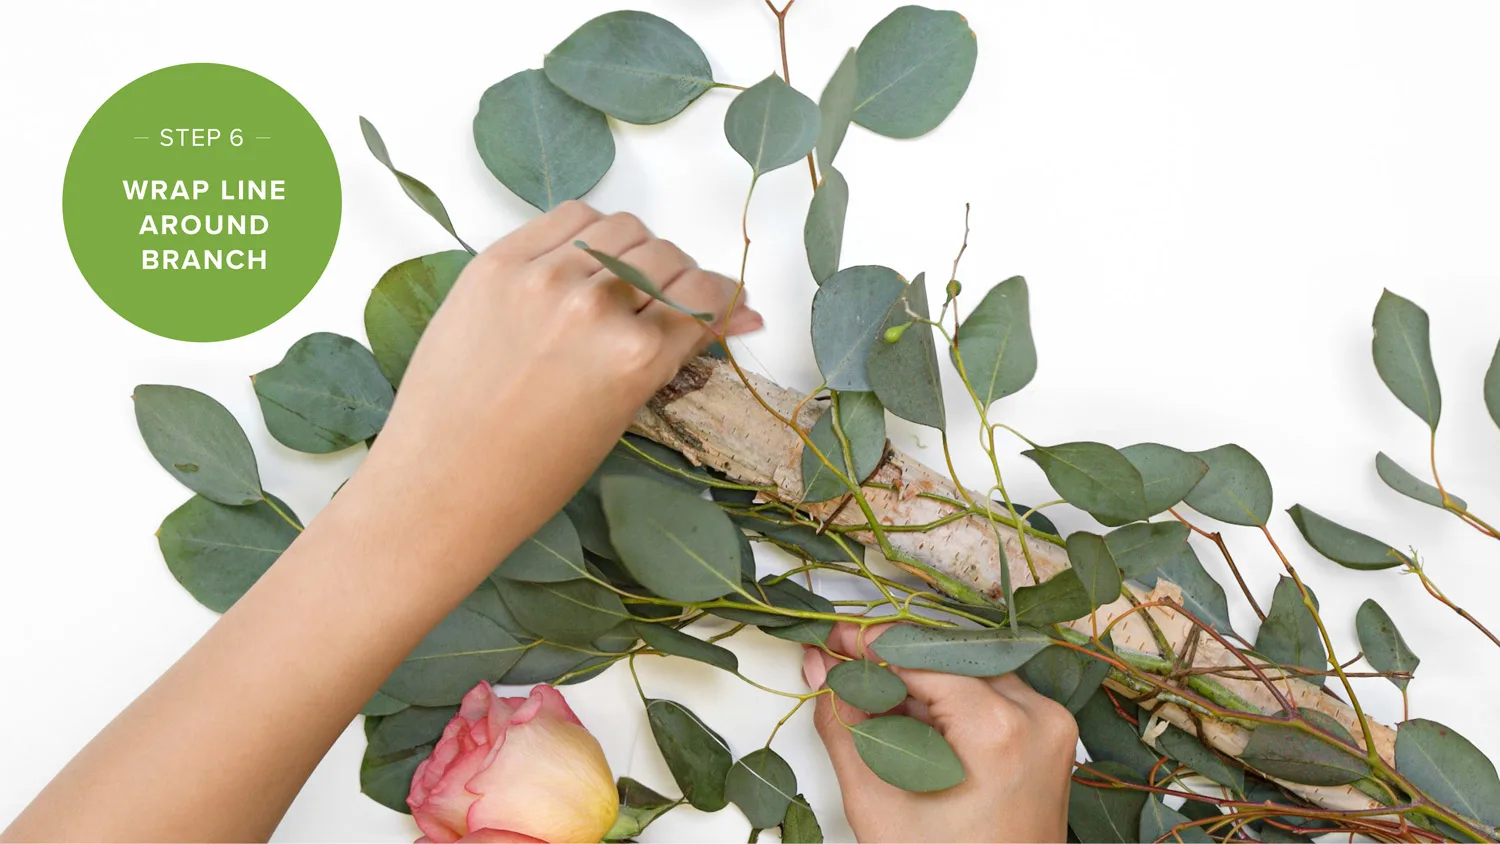
Step 6: Wrap the remaining line around the branch.
Take the shorter end of your line and wrap it around the branch to make a loop. You can adjust height by pulling the line higher or lower. To do this, go on a step ladder (or find a tall friend) and hold it up to see how it looks.
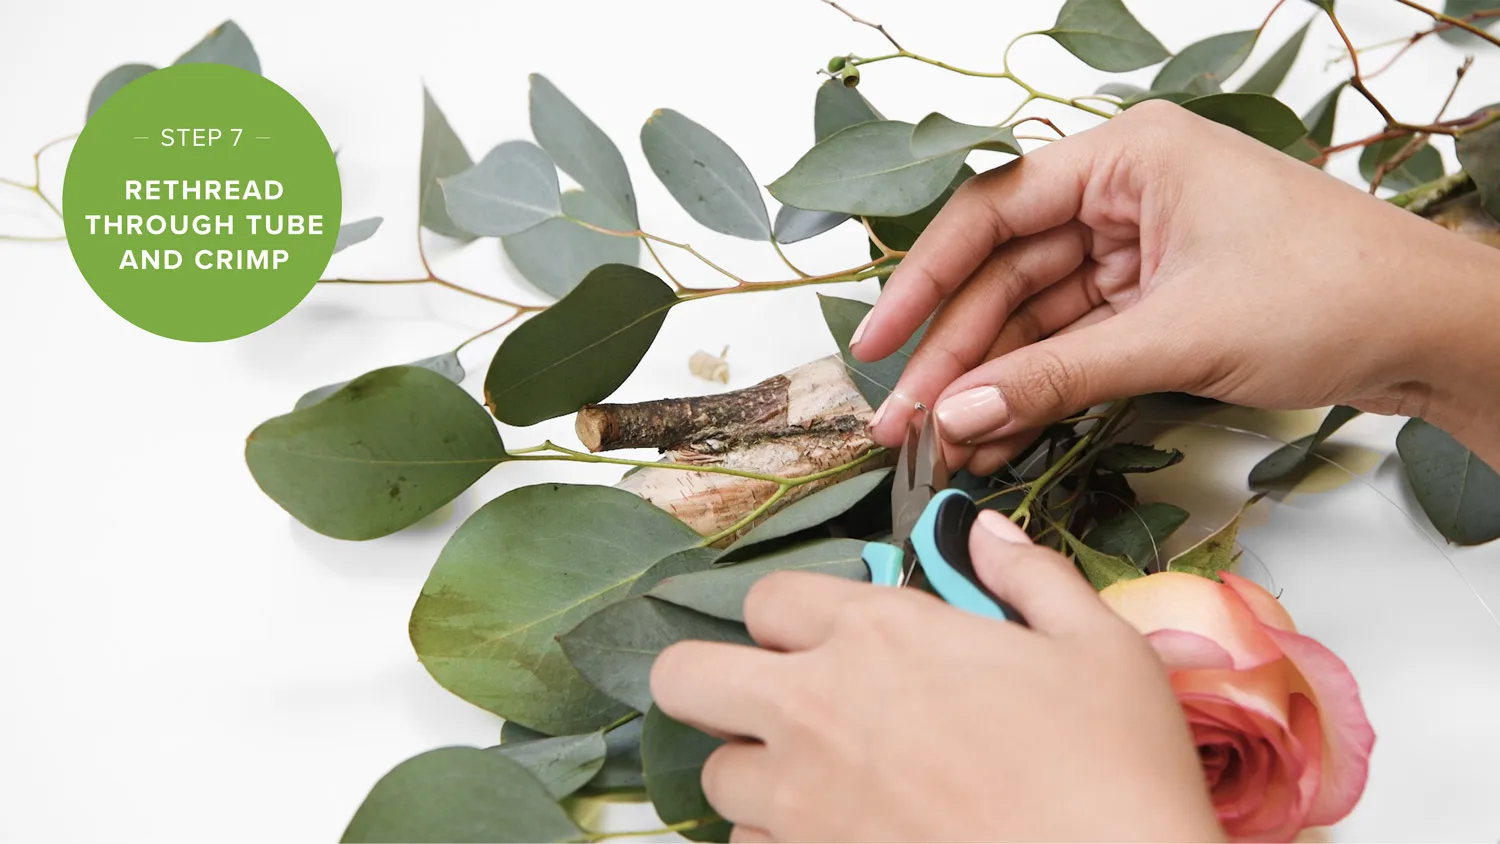
Step 7: Rethread the line into tube and crimp.
When you’re satisfied with your height, thread the end of the fishing line back into your tube and secure it with your pliers. Repeat this process for each line.
Pro Tip: If you know exactly where you want to hang your branch, hang the branch first before attaching lines. You can adjust height better this way, but will have a bit of a tougher time attaching and clamping the crimp tube. It’s best to do this part with a friend so you have an extra hand attaching the lines and an extra pair of eyes to see the full wall while you’re adjusting height.
You are now a proud parent of your very own DIY flower wall backdrop! This is great for a fun photobooth area or as a background for a sweetheart table. Since the flowers are attached to a branch, it’s easy to affix to any wall in your home or venue. It’s also easier to move around in case you find a better spot! To keep your flower wall alive, mist it periodically to keep the blooms fresh. You should also keep this away from direct sunlight.
Now that you know how to make a flower wall, take a look at these wedding flower walls and other great DIY flower wall ideas!
7 DIY Flower Wall Ideas to Inspire Your Style
These flower wall ideas will inspire you to create a unique wall with a variety of shapes, sizes and colors! Get some inspiration for your next big event to see how you can wow your guests.
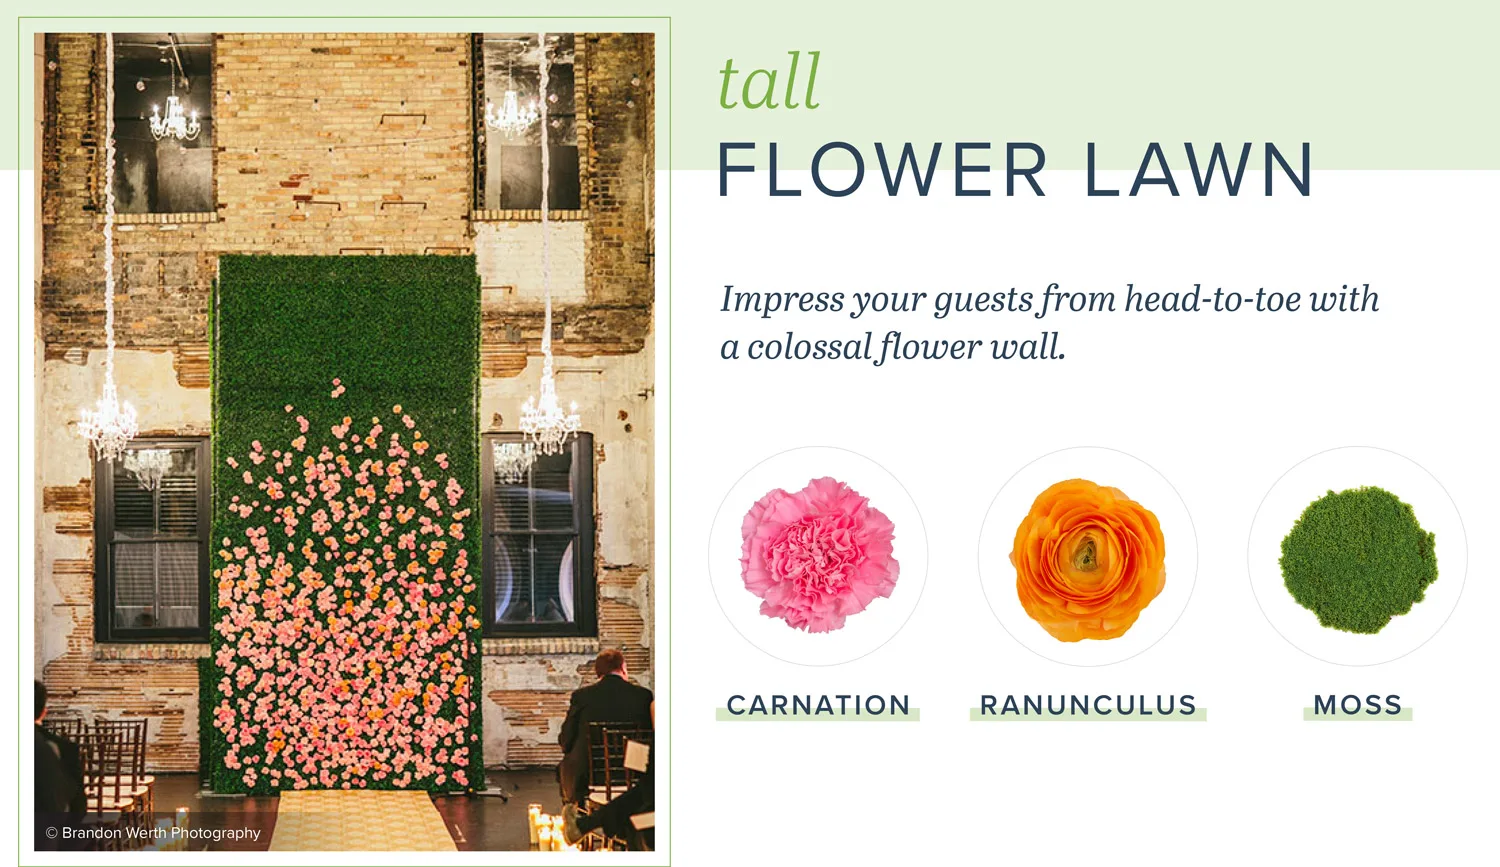
Photo courtesy of Brandon Werth Photography
Get the look:
Create an arch effect with a strategically arranged flower placement.
Use moss and other greenery to fill out a taller wall and save you from using as many flowers.
Place a tall wall at the end of the wedding aisle so you can have elegant wedding photos in front of your floral paradise.
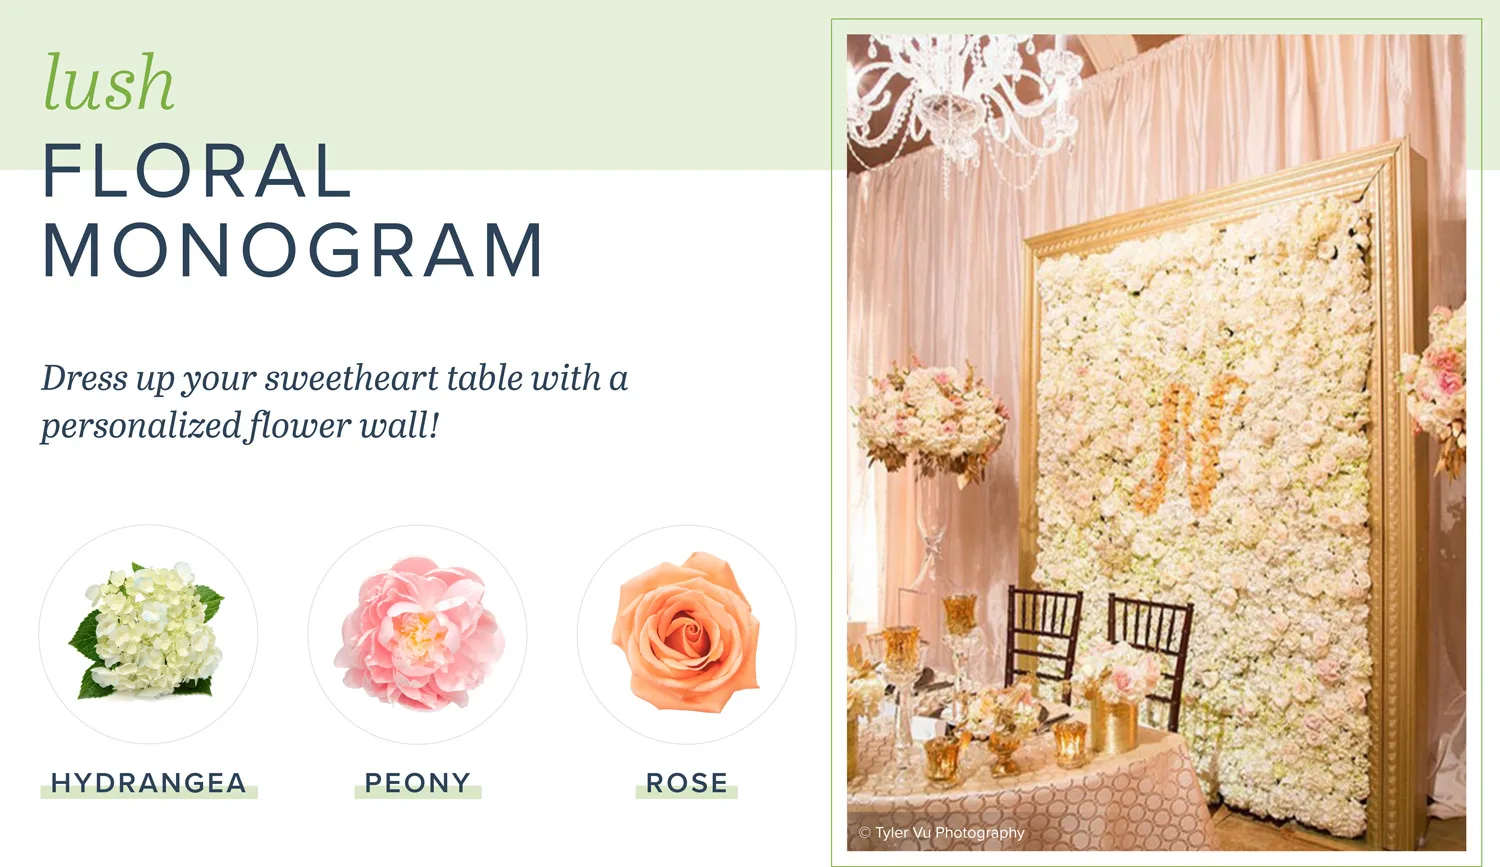
Photo courtesy of Tyler Vu Photography
Get the look:
Create a monogram using contrasting flower colors.
Light pinks, whites and creams create a delicate look and complement a pink-themed wedding.
Use decorative panels to frame your wall and give it a cleaner look.
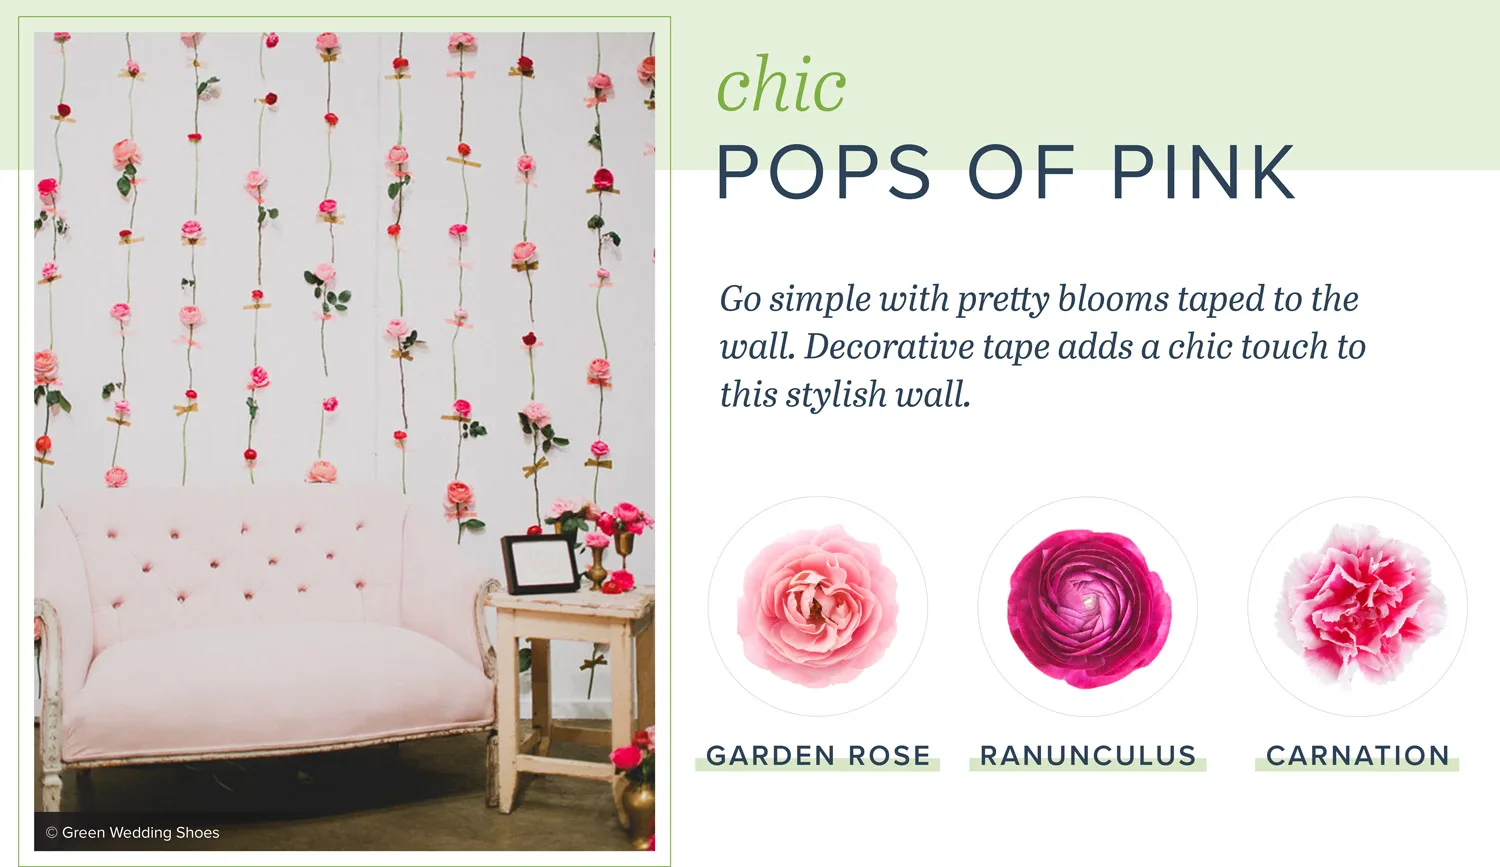
Photo courtesy of Green Wedding Shoes
Get the look:
Use colorful washi tape to attach flowers to the wall.
Make colorful floral arrangements with the leftover flowers.
Match your flowers and decor for a pretty and cohesive feel.

Photo courtesy of Sara Reeve
Get the look:
Vary your flower placement for a fun and assorted look.
Fill in spaces with greenery to create a diverse color palette.
Use contrasting colors to make your wall a statement piece for your party or wedding.
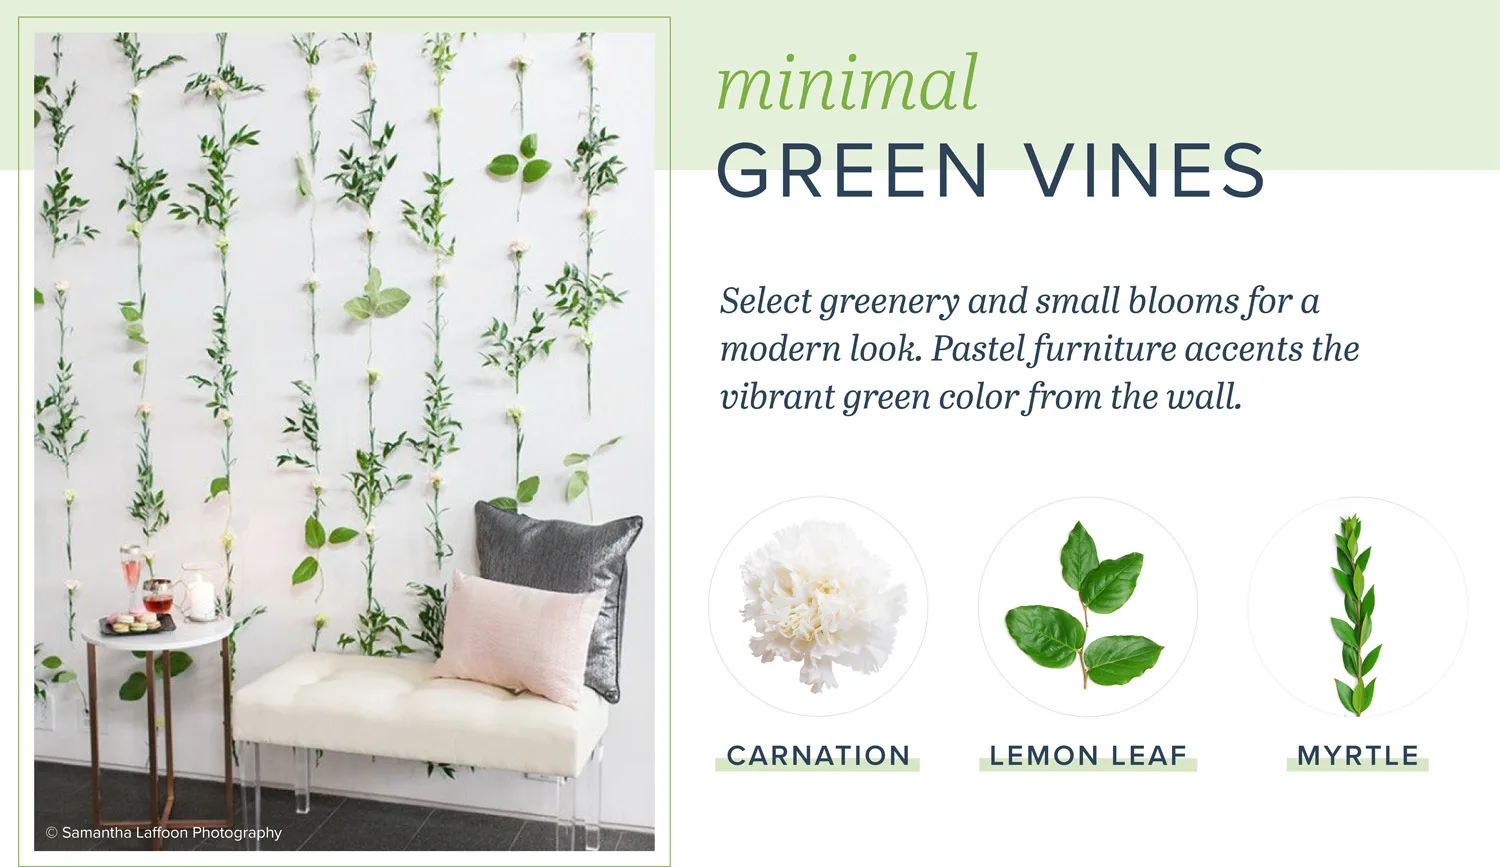
Photo courtesy of Samantha Laffoon Photography, Willow Floral Boutique and Something Perfect Weddings & Events
Get the look:
Go minimal with an emphasis on greenery and subtle floral touches.
Keep the leaves and stems on your flowers for added pops of green.
Small blooms are the best choice for muted color accents.
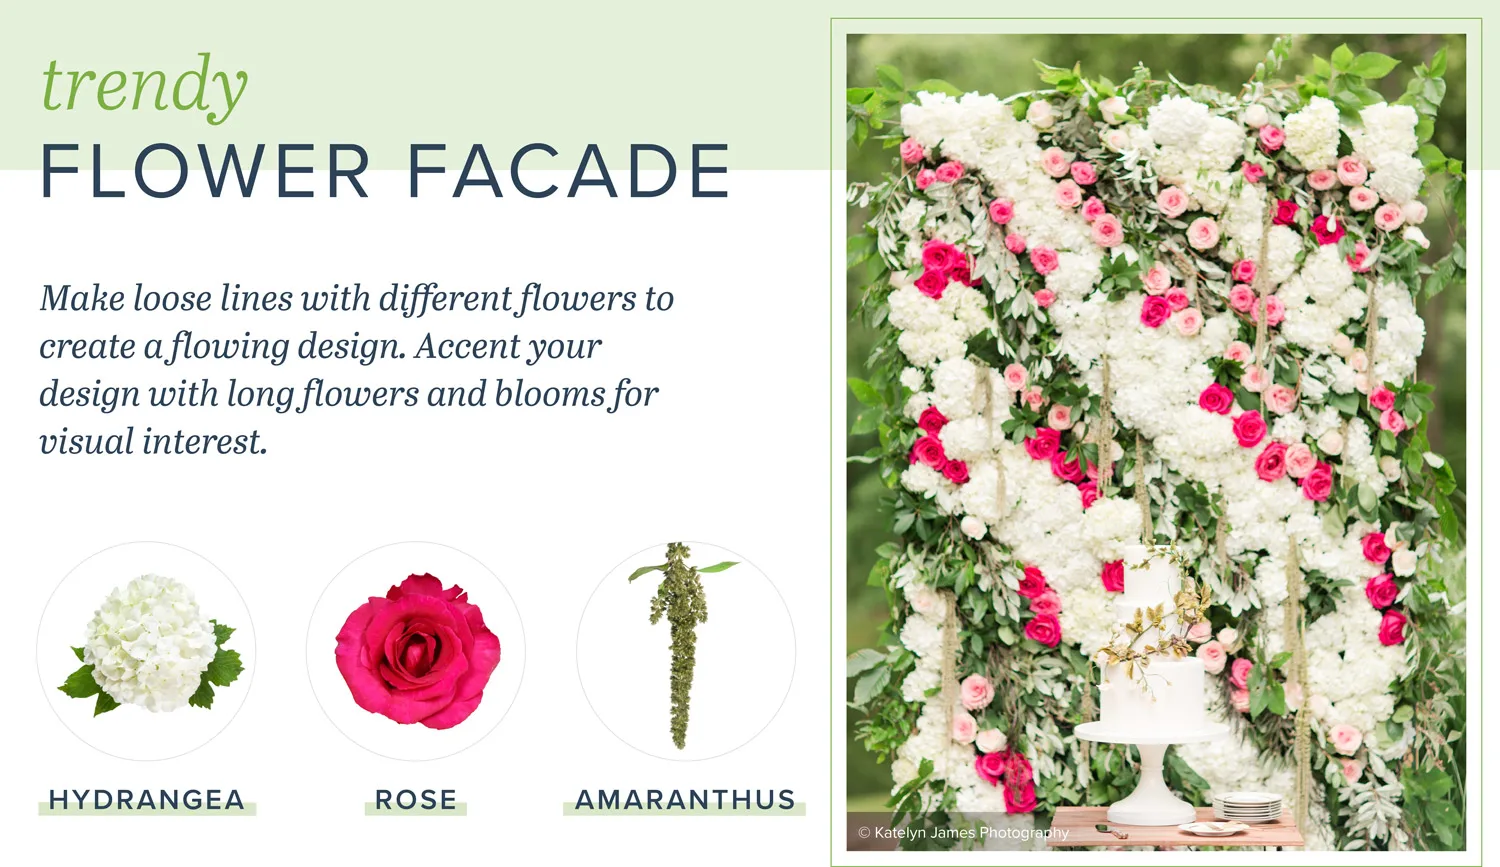
Photo courtesy of Katelyn James Photography and floral design by Amanda Veronee
Get the look:
Contrast light flowers with bold colors to emphasize your lines.
Drape amaranthus flowers in varied spots around your wall to add texture and to break up the prominent design.
Use different types of foliage to fill in the space in your wall and create a lush look.
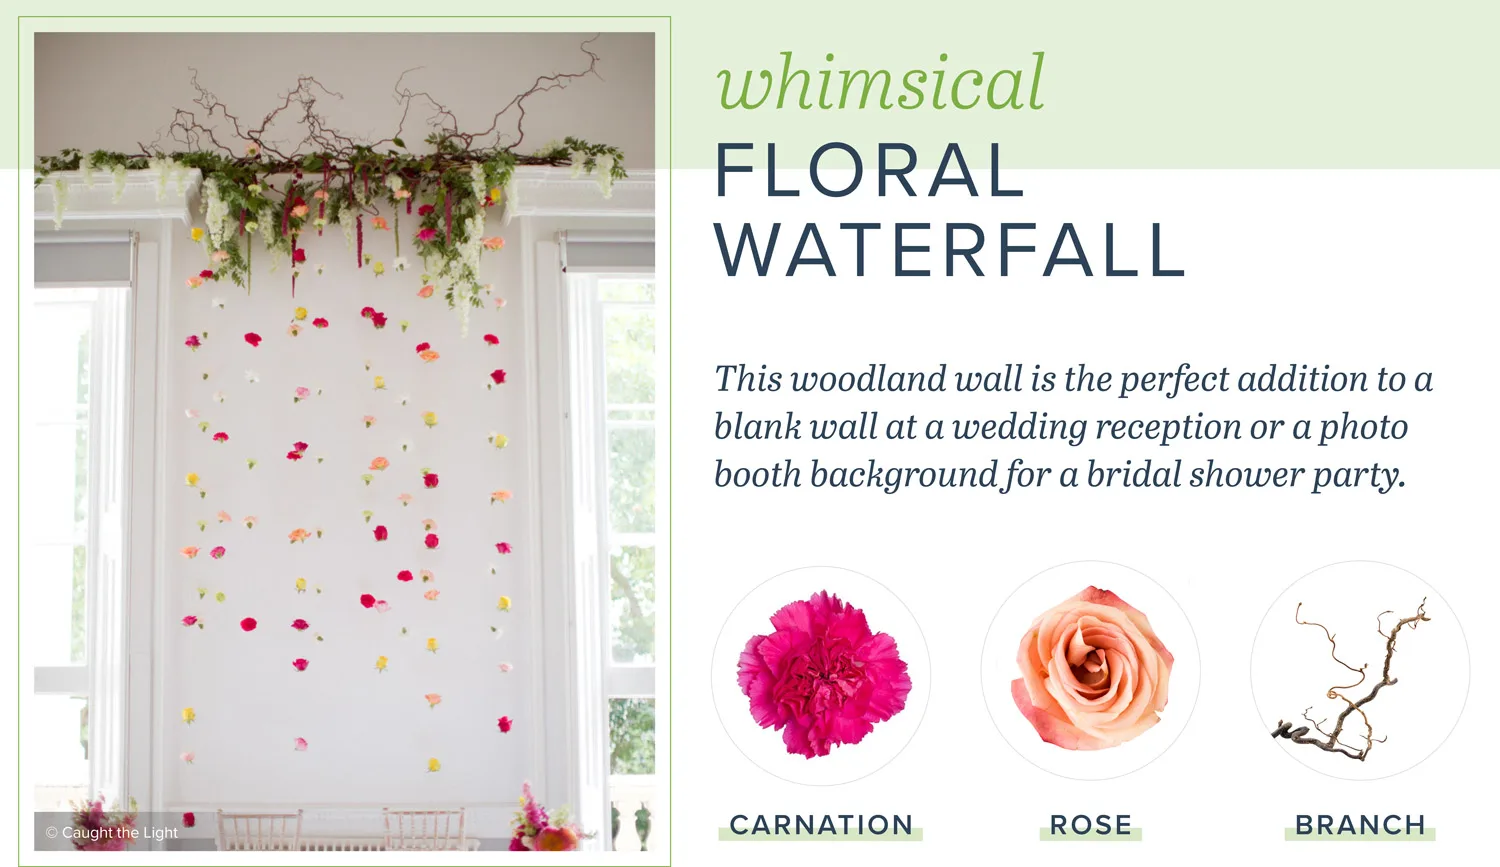
Photo courtesy of Caught the Light
Get the look:
Pick bold-colored flowers if your hanging flower wall is against a white background.
Decorate the hanging base with lush greens and branches to hide any unseemly pieces and to add character to a simple wall.
Use varying lengths and spacing for your lines to create a visual waterfall for your guests.

Now you have a beautiful flower wall that is all your own and simple to make! If you’re still itching to flex your design muscles, try making a pretty balloon arch or flower chandelier to welcome your wedding guests or to add another fun photo background for a bridal shower. Don’t forget to pick up the perfect bridal bouquet after all of this fun DIYing!