September 07, 2017
Flower Chandelier DIY for Your Next Party
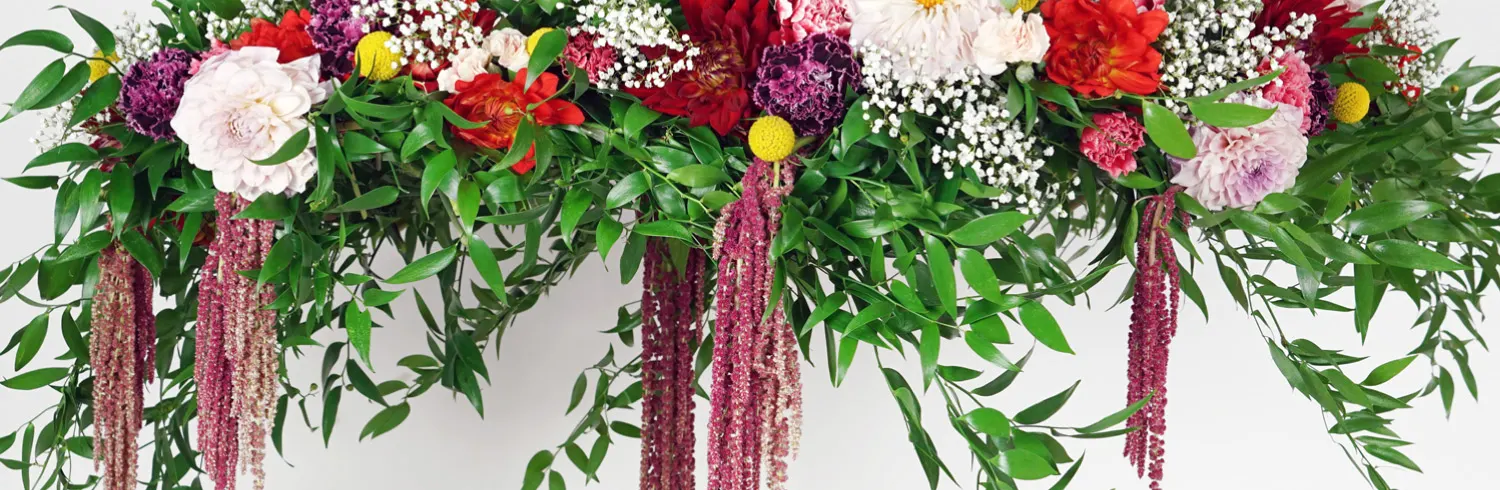

Flower chandeliers are quickly becoming a notable design element for many of life’s celebrations, both big and small. Whether you’re planning a bridal shower, hosting an outdoor dinner party or celebrating a birthday, taking your floral displays to new heights not only looks amazing, but smells amazing too.
Watch on Youtube-Flower Chandelier DIY for your Next Party
Embed on your website
If you’d like to make a floral chandelier for your next event, but don’t know where to start, don’t worry, we have everything you need to know. Our step-by-step guide and video tutorial will guide you through making a flower chandelier for any occasion.
Before you roll up your sleeves, let’s make sure you have all the materials you’ll need to get started.
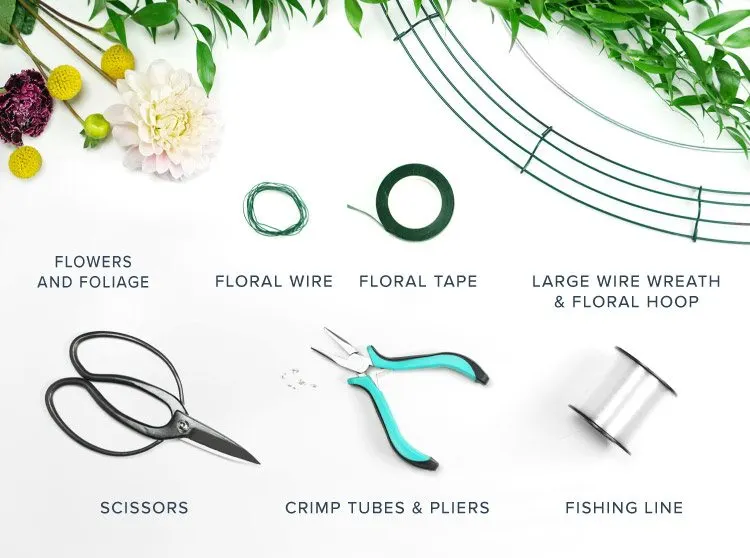
Flower Chandelier Materials
Fresh flowers– When selecting flowers, have a theme in mind, consider which blooms are in season and also which flowers will hold up the longest without water. Fresh blooms of different types work well for this project. The florals you select should have long stems, this will make it easier to attach the flowers by threading them through the base.
Fresh foliage– Select fresh foliage that matches the theme of your chandelier.
Floral hoop– You’ll need a floral hoop to create the top tier of your chandelier. We recommend a hoop that is 19 inches in diameter, but you can choose any size, as long as it’s smaller than the large wire wreath.
Large wire wreath– A large wire wreath frame will act as the base of your chandelier. We recommend one that is 24 inches in diameter. If you’re not able to find a suitable wire frame, a hula hoop will work just fine. A green hoop is ideal for this project, but if you can’t find one, you can always paint it.
Floral tape– Floral tape is ideal for fresh flowers due to its strength and elasticity. It also comes in natural hues like greens and browns which blend well with flowers.
Floral wire– You’ll use floral wire to attach fresh flowers and foliage to your small hoop and large wire frame.
Fishing line– You’ll need fishing line to hang your chandelier. You can also opt for twine, string or ribbon if you’re going for a rustic or vintage feel.
Scissors– You’ll need to cut the tape and fishing line, so have scissors or a sharp knife handy.
Crimp tubes– You’ll use crimp tubes to secure your fishing line in place. These are small metal rings that will make it so your knots don’t slip out of the fishing line.
Pliers– Pliers will be used to secure the crimp tubes to the fishing line.
Pro Tip: If you use a hula hoop for the base of the chandelier rather than the large wire wreath frame, paint it green the night before.
Make sure to have fun picking out your fresh florals and foliage. For this tutorial we used nine bushels of greenery and ten+ flower bouquets. To make your selection a little easier, we created a recommended list of flowers that are long lasting even when out of water.
Best Flowers for Your Flower Chandelier
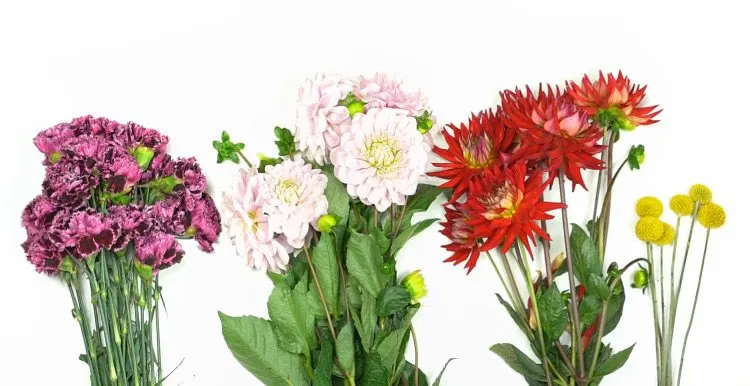
Flowers that hold up well out of water are the best to pick for your DIY chandelier. We recommend the following blooms:
Pink Hyacinths
Carnations
Amaranthus
Hydrangeas
Baby’s Breath
Craspedia
Peonies
Dahlia Buds
Have fun picking out your florals and then get started creating something one-of-a-kind! Read on to find out how.
Flower Chandelier Step-By-Step
Project Time: 1 – 2 hours

Step 1: Attach the large wire wreath to the floral hoop with the fishing line.
You should determine how far apart you want the wire wreath and the floral hoop to be, and then cut that amount of string in four pieces. Each piece of fishing line should be of the same length so that your chandelier hangs steadily. Attach the large wire wreath and the floral hoop together using the four pieces of fishing line evenly spaced around the diameter. Secure the line with traditional knots and a few pieces of scotch tape.
Pro Tip: Secure the knots using crimp tubes and pliers for a more steady chandelier.
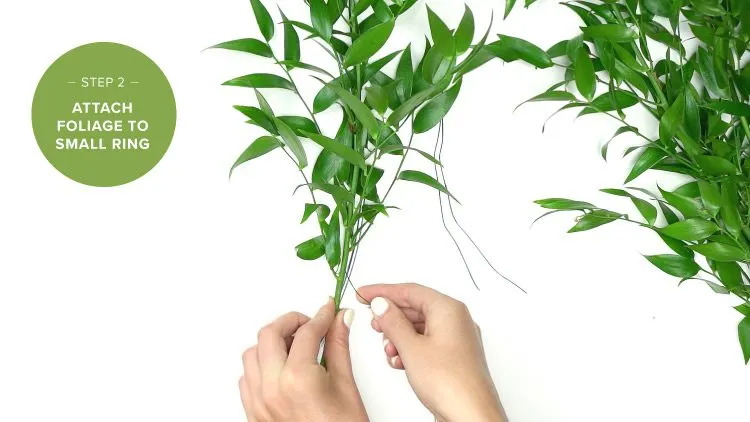
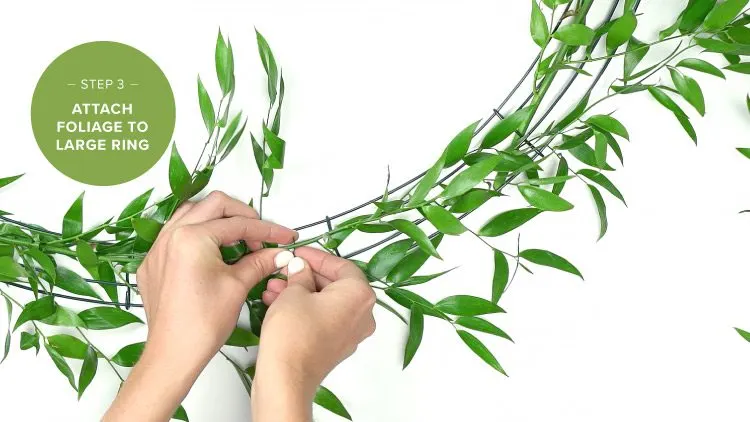
Step 2: Start by wrapping lengths of greenery and foliage around the small floral hoop.
Wrap the pieces around the hoop using a small piece of floral wire in order to secure them. Use the tape where you want to guarantee your greenery will stay put or where you think it is needed. You can also use a combination of both. Although, we mainly used the floral wire. Keep in mind the more secure your chandelier is, the better. Make sure that the foliage hangs naturally as you are wrapping. Distribute the greenery evenly and avoid leaving any open spaces between the wire ring and the large metal ring. You won’t be adding any flowers to the top tier of your chandelier, so feel free to make the foliage as dense as you’d like.
Pro Tip: Wind each piece of foliage around the wire ring for added support before attaching with the tape or floral wire.
Step 3: Next, add greenery to the base of your chandelier, the large wire wreath.
After you’ve finished the top tier of your chandelier, move on to designing the bottom. This portion is the base of your chandelier, so create layers and design with intention as this is the part that’s most visible to guests. Start by adding a few layers of foliage wrapping each individual piece around the wire wreath one at a time securing with a small piece of floral wire. Be mindful of the manner in which the foliage hangs and set it in place using the wire and tape as needed.

Step 4: Hang your chandelier.
It will be easier to design and assemble your flower chandelier while it’s hanging. Suspend the structure using fishing line, twine or ribbon, taking into consideration how the chandelier will hang. Will it be attached to the ceiling? An exposed beam? You should also consider the height you’d like your chandelier to be, and measure the length of line accordingly. Use three pieces of twine or fishing line of the same length to hang the chandelier. This will assure it’s balanced and will hang correctly. Secure your chandelier by tying extra knots and using crimp tubes and pliers to keep them in place.

Step 5: Attach flowers to the large wire wreath.
Once you have a layer of greenery, it’s time to add the fresh blooms. Attach each bloom one-by-one by placing the stem into the foliage. Intertwining the stems of each flower through the greenery will help make sure that they stay put. Create clusters of three flowers equidistant from one another around the large wire wreath frame and then design how you’d like. Creating something unique is the best part of this project. Plus, it doesn’t have to be perfect!
Pro Tip: Be mindful of the size and colors of blooms that you use. Select a variety of flowers with different colors and textures to make your chandelier more visually appealing.
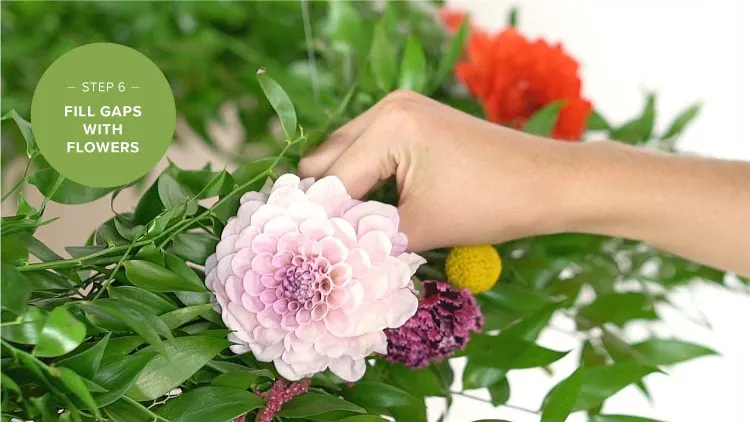
Step 6: Fill in gaps of your chandelier with small flowers and extra greenery.
Use smaller blooms and vines to fill in the gaps of your chandelier. Consider balance, color and shape of the flowers as you are adding in a few extra.
Pro Tip: Step back from your project every so often to be sure you’re on the right track.
While trends vary, we know that the flower chandelier is here to stay, and for good reason! Now that you’ve created a beautiful decor element, make sure you get to enjoy it for as long as you can with the care guidelines below.
Mist your chandelier with water before your guests arrive to ensure that your flowers look their freshest for the celebration.
Avoid hanging your chandelier in direct sunlight, near heating and cooling vents or near open windows.
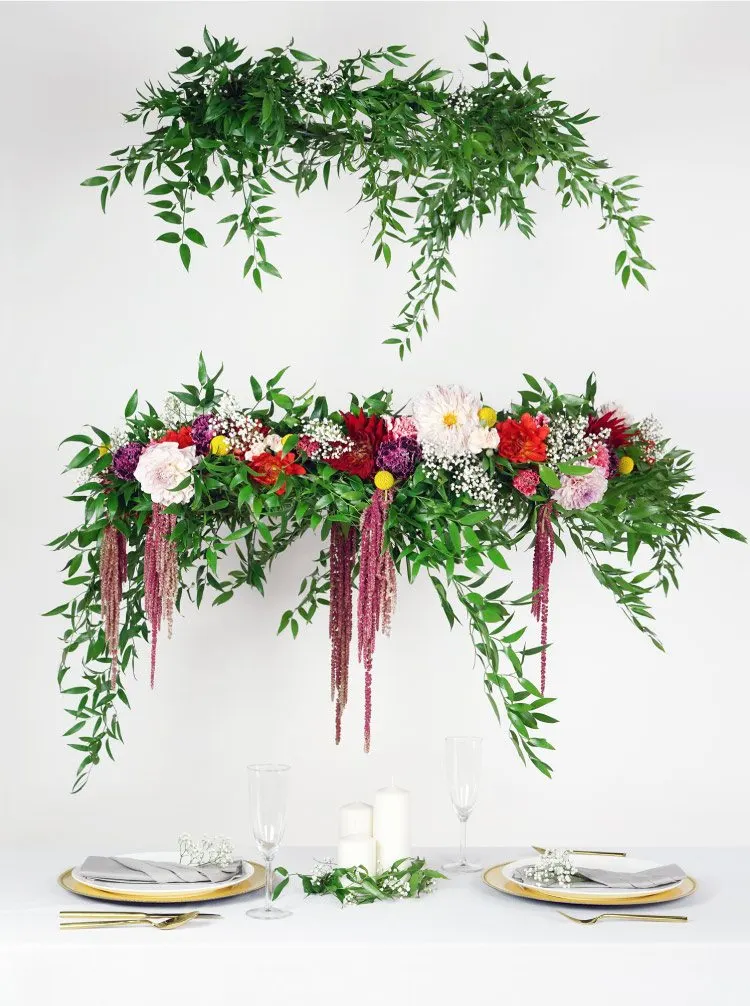
Flowers are a staple decor element for all of life’s best celebrations. Whether wrapped in a bouquet, draped with greenery or hanging from new heights, there’s something extraordinary about incorporating flowers at special events. They become an integral part of the memories we make.
No matter what type of event you are celebrating, you can find a floral chandelier that suits your style and complements your venue. Not to mention, creating fresh DIY decor elements will help you keep your pockets full.
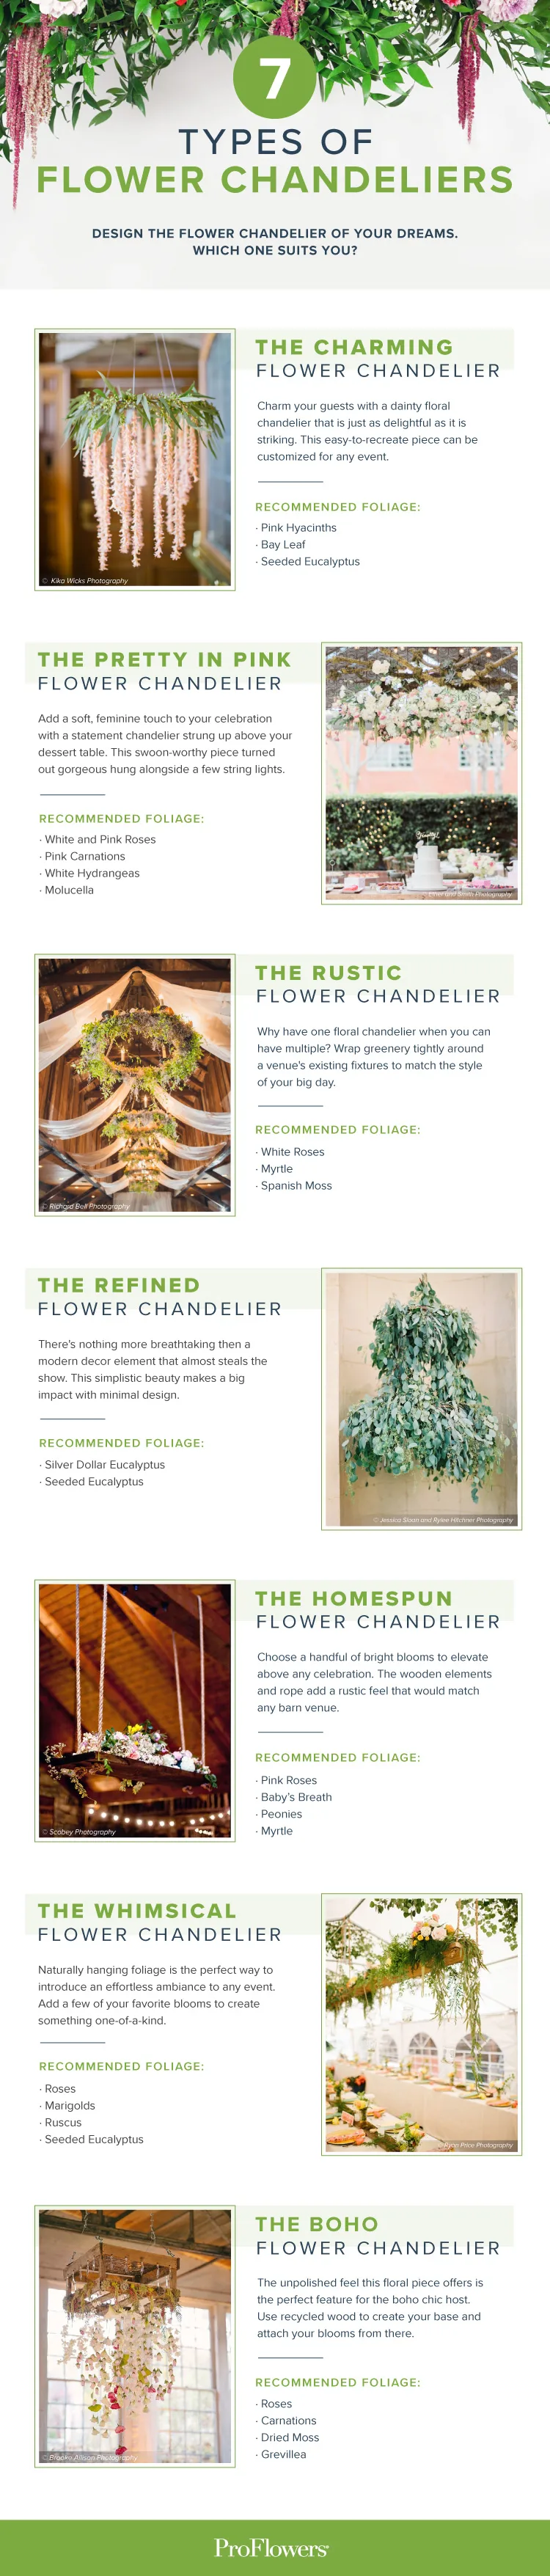
There are plenty of unique ways to design the flower chandelier of your dreams. Browse through our flower chandelier inspiration below to get a few ideas before you start your own.
Make this do-it-yourself as simple or as extravagant as you’d like and remember to have fun. If you’re looking for more decor inspiration, check out our guide for how to make a balloon arch and don’t forget to pick out fresh bouquets for your project!